STATEMENT OF INTENT
For this project, I have chosen the theme 'Framing' and I'm hoping to show these images and my progress in galleries and use my best and worst to continue improving my work more and more. I was intrigued by the different possible outcomes I could have with framing. Towards the end of the project I am going to stick to a certain technique from Photoshop and make my final gallery based on that, making a final gallery portfolio showing my work. The tools are quite simple and straightforward to use and I am planning on making my website look as professional as possible using the skills taught to me by teachers and peers.
In my initial research, I will look at three photographers that focus on framing which are Christopher Anderson, Henri Cartier Bresson and Dan Ginn. The reason why I chose Christopher Anderson was because he was recommended by my teacher, and his work inspired me especially with the hint of black and white he had in his photos. I chose Henri Cartier Bresson because he was a photographer at the start of the photography industry which meant there wasn't many resources he could have possibly used but his photos were so intriguing especially the photo I chose to do my research on, he incorporated black and white into his photographs which I'm inspired by as I intend to take photos like that. The last photographer, Dan Ginn's photo, feels like something I could realistically recreate which is why I chose it. I intend to take more photos like that. Dan Ginn inspires me because I feel like his photos really entrap the reader, intriguing them in and with my photos I would like to leave the same effect.
My first thoughts about Framing, was to take photos that were quite unrealistic of things just being framed until I found a certain message I wanted to get across and that was to show 'the beauty of nature' through various different frames whether it be using a mirror or an actual frame. I have expanded my ideas of this theme by thinking a lot more realistically about what photos I can achieve, the ideas I had were unachievable and not something that could have been done.
My starting point is to first take a few pictures in school, either with a model or using a mirror, then I am going to go through them and see what I need to work on after doing so I will again take some more photos in school and repeat that same process. My next step then would be to take pictures outside of school, using either my phone camera or if allowed the DSLR Canon camera from school. I have many places in mind that I could go and take photos related to my work outside of school but also inside of school using my peers to help me take my photos.
I want to try a variety of different methods in this project and see what suits it the best, generally speaking, in my shoot in school I would be using a manual DSLR Canon, a white or black background and Safa Ahmed to model for me. Depending on the photos I'm taking I might have to use the field outside to actually get the nature part in, I also want to get things such as flower frames or a flower crown to emphasise the natural part of the photo more.
As this is my second photography project, I have quite a lot of knowledge on how to use the camera and any other equipment needed. Outside of school if I am not allowed to use the camera I will be using my phone camera and take a lot of photos and maybe even try different filters.
During these last few lessons of the year, I aim to finish any loose ends and finish up uncompleted work. I also need to do my third 4c's for this project and take as many pictures as possible. I hope all of this shows my progression to my final gallery that are going to be my photos that I have developed in Photoshop or Photopea to make my photos the best they can be. Once I've taken photos I'm going to check through them and choose my best and worst photos to know my mistakes for the next set I take. These best photos will go in a final gallery at the end.
Throughout my learning journey, I will put my first pictures at the top and going on it will show my progression, how my photos have improved as I've looked at what I need to do to get better. In the galleries, I will be doing my best and worst so that I can show what I need to do for the next set of photos I take, not only for that but also to show my development. I can use this to reflect on my work and feedback on what needs to be done, I can ask peers or my teacher to look at my work and tell me what to work on by giving constructive criticism. For Photoshop, I will use tutorials and past knowledge from my texture project. At the end of the project I will make a final gallery for my best photos and write an evaluation on my Framing project
MIND MAP

Framing Fruits Mood Board


4C'S ROBERT CASPERS

Context
"Robert Caspers is a painter. Since 2014 the record price for this artist at auction is 245 USD for Still life with fruit, sold at David Lay FRICS in 2014. Robert Casper was an American Postwar & Contemporary painter who was born in 1928. Robert Casper's work has been offered at auction multiple times, with realised prices ranging from 122 USD to 3,600 USD, depending on the size and medium of the artwork. Since 2012 the record price for this artist at auction is 3,600 USD for The Wave (Monhegan Island), sold at Shannon's in 2017. The artist died in 2012. Robert Casper was born in NYC in 1928. He studied with Cameron Booth at the Art Student’s League* and Queens College and was taught for many years by Hans Hofmann at the Hans Hofmann School of Fine Arts* in New York and his summer school in Provincetown. He received his Master of Arts degree in Art Education from Columbia University. From 1954 – 1958 he worked in the animation industry, spending a good deal of this time at UPA in Burbank, CA, working as an assistant animator while freelancing producing storyboards. He later opened his studio on Ash Ave. in Flushing, NY where he painted for many years. His lifelong passion and work was painting and form. He had the advantage of coming of age during the Second World War when m ... Displaying 750 of 2483 characters."
https://www.askart.com/artist/Robert_Casper/11093024/Robert_Casper.aspx
https://www.mutualart.com/Artist/Robert-Caspers/1FDB5500FB7AF8DA/Biography
https://www.askart.com/artist/Robert_Casper/11093024/Robert_Casper.aspx
https://www.mutualart.com/Artist/Robert-Caspers/1FDB5500FB7AF8DA/Biography
Composition
I have chosen to research a traditional oil painting, rather than a photograph, as I feel this fits in well with my ideas of how I would like to do my framing project. I can clearly see in this painting that the artist wanted his painting to be old fashioned, considering the subject matter of fruit is something similar to traditional still life paintings across the centuries. In the painting there is a circular frame that circles a still life of different types of fruits, like grapes, apples, peaches and vine leaves. I can clearly see that this oil painting has been set during the day because of how the lighting reflects on the fruit, there are many different colours (red, yellow, green) that the light reflects on, making it pop out and a lot more unique. In particular, there is a strong highlight on the soft green grapes that makes them shine out. Inside the painting, I can see that it's a very shallow depth of field with the basket all the way up to front; there's a small hint of the fruit being shown resting on a table, which is right at the front of the picture plane. The main shape I can see is triangular and is made up from the leaf in the top of the painting, with the fruit and foliage spreading out in a diagonal line to form the triangle. This is a very traditional method and is used to make the viewer look at the top of a painting, with your eyes travelling around the picture. The shadows on either side of the picture help to make the main subject stand out and to help frame the objects as they are in a contrasting colour. Looking at the painting, I can see that it is very carefully painted, almost realistic and I feel that I could reach out and touch the fruit.
Connection
It's quite clearly shown that this photo contains fruit which is what I intend to do my photos and the technique that has been used is framing, this links my work directly to this photo because I am looking to frame fruits. Throughout my work I intend to show the journey of fruit, how it grows and possible mold growing, this photo is a clear link to my work and I plan to create very similar outcomes. In a photo, you have to pay attention to every single detail, every corner of the photo which is what the photographer has done and which is what I want to do to prove that all the components of the image need attention. I like the way the framing has been used and the way the photographer has taken this shot even though there wasn't many resources the photographer could've used at that time.
Comment
In my opinion, I really like this photo and think that it has many strengths, such as the way the fruit has been presented with the lighting, because of this being taken a long time ago the rustic touch just adds to it considering most designs like this have been changed now. There's not really any special meaning behind the photo, the photographer just liked taking pictures of fruit and decided to use framing. The thing that I am most fond of is the way the fruit has been laid out, the lighting reflecting on it overall and the way that it looks rustic and beautiful, something you would find only in the time the photo was taken. The way the predominantly (primary) colors of the fake fruits contrast with the color of the frame creating a smooth layer of the photo all around. The image is quite simple which just adds to the beauty of it, the fruit is the main focal point but the frame just adds to it making it look a lot more interesting. Overall, I think this is quite a strongly composed photo with many positive qualities. The photo seems like a painting and using photoshop I intend to make my photo seem similar so that my work flows through the page throughout.
4C'S ANDREW SOUND

Context
I couldn't find any information on the photographer Andrew Sound, it seems like a random photo taken.
Composition
The antique framing technique is used in a landscape photo that showcases a variety of fruits arranged on a table. The most distinguishable feature of this photograph that draws the viewer's attention is the obvious contrast between the hues of the fruits presented and the framing element, which creates an entrancing effect on the observer. The placement of the fruit in the center of the photograph, in proximity to the camera, which has resulted in a shallow depth of field that creates a shadow towards the bottom of the fruit as the lighting hits it from the top right. This effect highlights the photographic technique utilized to produce the image. There is no clear application of the rule of thirds in the photograph, however, I believe that the apple on the left hits a sweet spot and grasps the viewers attention instantly.The beautifully woven patterns, both inside and outside the frame, appear to frame the fruits almost as if it's keeping it in. The patterns' harsh, yet delicate lines with the detailed small-scale decorative elements that embellish the frame, making the image even more appealing to the viewer. In consideration of the illumination reflecting off the fruit and the manner in which the lighting was deliberately positioned to accentuate the textures of the produce, I believe that this photograph was captured within a studio setting. It is probable that the ISO and white balance settings were used in automatic mode, considering that it was not captured in an outdoor environment and so that the best photo could've been created. Additionally, the shutter speed might have been delayed for a few seconds since the fruit was securely positioned. Based on my research of the photograph, it is apparent that it is from a modern photographer, thereby implying that the availability of more modern resources and advanced technology being used. Finally, it is possible that the utilization of Photoshop, was used in enhancing the overall quality and visual look of the photograph so that the image looked better.
Connection
This photo links directly to the work I intend to do, the theme of this image is framing which is the theme I have chosen to do, it captures the framing of the fruits quiet well which is what I want to do in this project. Additionally it can link to all of my other researched photographs because it is very creative and of a very high quality which is what I am going to make sure all the photographs I take during this project are up to a very high standard, using my nose for quality.
Comment
I think this is a very strong photo with many positive qualities, the way the fruit has been laid out makes me think that the photographer must've thought really hard about the arrangement before even going for the photo, and this makes me really like this photo. This image just looks quite pleasing, intrigues the viewer into noticing all the little details, such as the smaller fruits and the detailing on the frame. This photo has no specific meaning; but that way it looks, the way the colors of the fruit clashes around the color of the frame makes the photo look all the more interesting. Overall, I believe this photo has been composed in a very good way, making it look very alluring and powerful and I intend to take pictures of framing that look quite this good in the end.
4C'S ALEX BAKER

Context
"Alex Baker" My work as photographer and videographer has taken me across the globe and it’s always a thrill discovering and documenting new places as well as capturing new faces. While I’m based in England, my travels to places like India, Thailand, Afghanistan, South Africa, Iran, Singapore, Europe and others mean I never complain of boring work. With over a decade of professional experience and a special passion for globe and it’s always a thrill discovering and documenting new places as well as capturing new faces. While I’m based in England, my travels to places like India, Thailand, Afghanistan, South Africa, Iran, Singapore, Europe and others mean I never complain of boring work. With over a decade of professional experience and a special passion for portraits, live events and covering humanitarian work (especially that of charities and NGOs), I’m drawn to people: the stories their lives and work tell. " portraits, live events and covering humanitarian work (especially that of charities and NGOs), I’m drawn to people: the stories their lives and work tell. "
Composition
In this landscape photograph that has been taken at eye level it is clear that the focus point is the woman placed right in the middle of this view of the greenery. Whilst she is leading the background behind her, I personally think that there has been some strong lighting used in this picture to concentrate on the woman whilst the background has been blurred, so all the attention focused is on the woman with the mirror. When you first look at this photograph your eyes are drawn to the woman in the red dress because the huge mirror makes it seem as if she has no head which is confusing and interesting. This makes you want to figure out what is going on in this photograph, and how the photographer has made the woman's head invisible, and how you can see straight through the mirror, the photographer has clearly done that using Photoshop. There's leading lines in the back with the trees and it travels off into the distance, I believe, in this image that the rule of thirds has been used as the woman is not directly in the middle but quite to the side. The time of day looks like it's more in the morning so all the lighting is natural, the colors are mostly warm, browns and greens. This is quite clearly an outdoor shot and it's possible that a tripod has been used to make the image taken exactly in proportion.
Connection
This amazing photograph closely links to my work because I have chosen framing as a topic, and I personally feel that mirror reflections is an almost perfect type of framing. In this unorthodox picture you can clearly see that the mirror is being used as a transparent frame. Plus the quiet obvious mirror is showing the viewer the blurred mountains behind it, whilst making the woman in the red dress seem as if she has no face giving off a slightly creepy, eerie feeling. So the greenery in the far in the background is framed through the golden edged mirror. It has evidently been taken in light color and the faceless woman is obviously the main focus of the photograph. In the far distance you have the large broccoli shaped trees and some bushes too. Furthermore the photograph links to my work because I have decided to chose framing and to me I feel that mirror reflections is a type of framing. In this picture you can see that the mirror is used as a frame. The mirror is also reflecting all off the mountains around it whilst making the woman seem as if she has no face, so the greenery is framed through the mirror. It has clearly been taken in color and the woman is the main focus of the picture, whilst you have the green bushes, trees and grass surrounding her.
Comment
In this colorful photograph you can easily see that there is only one women alone, with a field of green grass and some huge trees far in the distance. It looks like it has been taken in the countryside because there is not one building in site, and it also looks like there is no people there, making it seem quite peaceful, calm and lonely. I love how sleek and refined this image is, it's not bombarded with harsh colors or extra components and props in the image, I love how simplicity of the image, yet it still has an allure to and I aim to try to incorporate this into my future work. There are no weaknesses to this images in my eyes, I am completely in love with everything about this, it is truly a magnificent piece of art. This image inspires me in many ways, opening my eyes to a completely new approach to this complex theme, how the task has been executed and the overall outcome, I aim to do something similar.
In the end, I changed my mind on what I wanted to do, however I kept this research up to show what I intended to do before and how I have made progress using that and changed the direction of my course.
In the end, I changed my mind on what I wanted to do, however I kept this research up to show what I intended to do before and how I have made progress using that and changed the direction of my course.
SHOOT PLAN 1
|
The equipment that I will be using is, for my camera I will use a Canon DSLR in a manual setting, I also want to use different items to make the photo better such as a frame because that is what I have chosen as my question. The changes that I would make to my camera settings, is that I would change my white balance depending on the location of the shoot, I would also change my iso so that the photo doesn't come out to bright. Depending on the natural lighting I might need a single studio light so the light can shine onto either the natural feature or the model's face.
The props that I am going to be using is a frame inside where the person modelling is in their own clothes or the point of nature that I am going to be photographing. The model that I will possibly be needing is Safa Ahmed as she has agreed to model for me beforehand. I plan to take at least over 30 photos so that I can choose my best ones for the final galleries and also improve my worst ones using photo shop or improve my 'good' ones so that it can be the best of the best. I am taking these photos because, not only does it link to my mood board but also because I want to show the beauty of nature using my photography skills that I have worked so hard on. It links to my research and my mood boards because using photoshop I will make some of my photos black and white to create an effect. I will also take pictures of nature that naturally frames an object, architecture and the middle of that frame would be either a model or an object. |
|
Shoot 1


Photoshop


Best and worst
|
I like this photo because it links quite clearly to my mood board, I asked my model to hold the frame this way. The natural light hitting on her face makes the photo look more appealing.
|
This is my worst photo because of the frame covering her face which ruins the entire thing, and it's too dark. The picture is also not taken from the middle, its not centered.
|
Shoot 2


BEST AND WORST


|
I really like this photo, because I think that it it quite interesting, I like the way the flower is like coming out of the frame and how the rest of the flower has been blurred out to focus on the main bit.
|
In my opinion, I think that this photo is not very appeasing because of how there is no real main focus point and also the way that it has been framed is not very nice.
|
TRIP PHOTOS 10/11/22
I went on the trip to Manchester because I felt that I needed more of a variety of photos, my photos were starting to become random and going on the trip helped me get back on track and have images outside of school.


Best |
Worst |
|
I think this is a very strong photo as you can clearly see the framing and I really like how the sky is fading, I took this photo through a tram window on my phone.
|
I believe that this is a very weak photo, with next to 0 qualities, it's too dark to see anything and this could've been changed by adjusting the ISO and WB.
|
After going over my work, I decided I didn't want to do this and decided that I wanted to take a different route, framing fruits and flowers which felt a lot more like something I wanted to do.
SHOOT PLAN 1 - REDONE
The camera I will be using is my phone camera, because I am taking these photos at home so that I get a bit of a start on my work. With my camera, I might for camera settings I could turn my flash on to see how the photos come out.
The prop I am going to be needing is the fruit and also the background, in this case I will be using the chair as it is black.
I didn't use any equipment other than the flash on my phone camera, considering this was my first photo shoot at home.
Since this was an inside shoot, I didn't need to do it a certain time.


I didn't do a best and worst for these photos because I didn't like these photos that much, it was my first photo shoot after changing the direction of where I am going and I didn't feel very strong about these photos.
Shoot Plan 2
The equipment that I will be using is, for my camera I will use a Canon DSLR in a manual setting, I also want to use different items to make the photo better such as a frame because that is what I have chosen as my question. The changes that I would make to my camera settings, is that I would change my white balance depending on the location of the shoot, I would also change my iso so that the photo doesn't come out to bright. Depending on the natural lighting I might need a single studio light so the light can shine onto the fruit with a nice soft feeling.
The props that I am going to be using is different frames and also the many fruits that I will be photographing.
The model that I will possibly be needing is just someone to help set out the equipment.
I plan to take at least over 30 photos so that I can choose my best ones for the final galleries and also improve my worst ones using photo shop or improve my 'good' ones so that it can be the best of the best.
I am taking these photos because, not only does it link to my mood board but also because I want to add a lot more to photos to make my website look a lot better.
It links to my research and my mood boards because using photoshop I will make some of my photos black and white to create an effect. I can also use photoshop to make the photo look better, with saturation.


Best and Worst
|
In my opinion, I think this is a very strong photo because of how it looks, the way the light is reflecting on the fruit and making it look quite pleasant.
|
I personally feel like this photo is not a strong one because of how shaky it is, I could've potentially used a tripod to make it less blurry and also angled it in a way to show the frame.
|
Shoot 3


BEST AND WORST

|
This is my best photo, because of how it appeals to the eye, the way the photo looks very pleasing and that it purely looks quite smooth, it has many strong qualities.
|
I don't really like this photo because I personally feel that it's way too bright and that you can't see the actual objects in the photo. To improve this I changed the iso and the white balance.
|
FRAMING FLOWERS
Professional Photo Shoot 28/10/22
|
|
I decided that professionally with the photographer, I was going to take pictures of framing flowers to have a variety on my page, the examples I chose were:
My pictures that I got were inspired by the images I chose on my mood board, I was happy with the outcome, the photos were different because I didn't use a box, instead I set it up the flowers so that the frame was on top of the flowers. I balanced the frame using two blocks so that this gave me space to arrange the flowers the way I wanted to. As I was arranging them I had to think about the composition, the colors and if I wanted some flowers to be coming out of the frame. I moved the frame down a bit a few times to make sure I got a good height.
The camera was on a tripod looking down on to the frame so that I could get a birds eye view of my frame, some of the photos I had to crop down so that the background wasn't shown but only the main frame with the flowers. This is because of the angle I had to use to capture the frame and the flowers together. The lighting was a studio light positioned on the other side of the camera, one side was dark, so I increased the power of the light and this made the dark spot get more light but this also meant the spot that had enough light got a lot more lighter and so I changed the ISO, white balance and bring the power down a bit. I also, added the gold paper that reflected some of the light onto the frame, and made it look a bit more shinier and made the flowers look quite appealing and gave it a warm glow. |


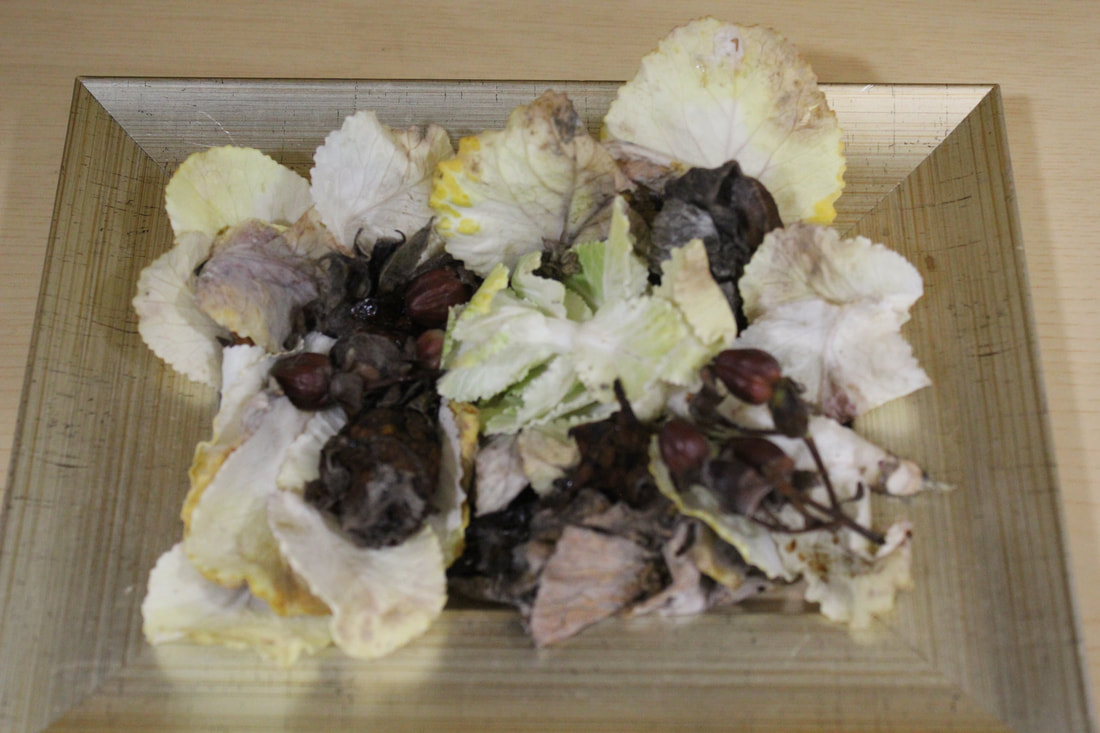
After the photoshoot of the flowers, I changed up the positioning a bit and added some autumn leaves that I got from the field and with the same power, angle of the camera, reflection of the gold paper I took some more photos.
I was really happy with the outcome of the photos and kept the flowers so that every week I could put some of the same flowers in the frame taking pictures to show the decay over time.
I was really happy with the outcome of the photos and kept the flowers so that every week I could put some of the same flowers in the frame taking pictures to show the decay over time.
RESULT


These photos were too dark in a specific corner so I adjusted the lighting to have more power, I also changed the composition, in the next photos I removed all the purple plants as they made the picture darker and I also wanted it to look a lot more natural so I made some of the petals from the flowers come out of the frame.


After these photos, I changed the composition to add some autumn leaves. However, I kept everything the same, like the camera angle, the lighting.


Photoshop

Steps


Original image and final

Steps


Shoot 6
|
My theme is framing and I was mostly focusing on framing fruits but I decided to widen my photos and have a wider view on framing in general, so I decided to have pictures on nature as a whole in framing.
I don't have any model as I am photographing nature, my main focus. My prop is the table, frame and the flowers that I used last week. I am using my DSLR Canon camera, the background is the oak table that contrasts with the frame and flowers. The shoot is indoor, so I didn't need to use a studio light or anything but I will have to adjust my ISO and White balance. The reason why I am taking these photos is to show the rotting of the flowers over time. |

|


Photoshop

Steps


Photoshop

Steps |
Tutorial |
|
|
I didn't follow a tutorial, I just played around in photoshop using the different filters to make my image look like a painting.
|


BEST AND WORST


|
In my opinion, I think that this is my best photo from the entire shoot, because I like how the colored flowers contrast with the rotting white flower, it gives the whole image a type of feel.
|
I feel this is my worst photo, considering how it isn't straight and also how the flowers have been composed. I also do not like how the photo is so dull, I should've changed the ISO and white balance.
|
One week after doing this photoshoot, I had to do it again using the same flowers, same frame to show the rotting of the fruit.


I wanted the images to be similar but the pictures were coming out a bit cold so I used a gold reflector to make the images more similar.


Best and Worst
|
I like this picture because I believe it has many amazing qualities, such as the warm tone and how it clearly frames the decaying fruit.
|
I don't like this image because it doesn't really match with my images, I wanted it to look a certain way and it came out different.
|
Mock Exam
Please press on the steps photos to read what I actually did.
Original
|
Final
|
Steps


I think what went well in this outcome is that It's a quite easy and simple tutorial to follow, I played around in Photoshop till I found the filter gallery which I thought was a very interesting feature with many different filters to adjust my images.
In my opinion, I can improve this outcome by increasing the smoothness, this will make it look a little less fake and so that it blends into the image.
In my opinion, I can improve this outcome by increasing the smoothness, this will make it look a little less fake and so that it blends into the image.
Original
|
Final
|
Steps


I think what went well in this image is that I used a different filter rather than using the same one again and again.
I feel like I could improve this outcome by decreasing the smoothness so that the brush strokes are more visible.
I feel like I could improve this outcome by decreasing the smoothness so that the brush strokes are more visible.
Original
|
Final
|
Steps


I am really proud and happy with this outcome because I especially like how it seems as if it's a still life painting, I think it has many strong qualities even with using a different filter than the one I normally do.
However, I can improve it by increasing the stroke pressure so that the darkness around the fruits increases.
However, I can improve it by increasing the stroke pressure so that the darkness around the fruits increases.
Final Gallery Draft


After a quick review of my outcomes and final gallery, I decided I wanted to take it down a different route of doing frame within a frame and grids. I wanted to do something else so that I could get a higher grade, I played around in Photoshop and looked at all my ideas.
This was my first trial using this different method that I'd like to continue with, the reason behind there being no tutorial is because I learnt this technique from a peer.
Original
|
Final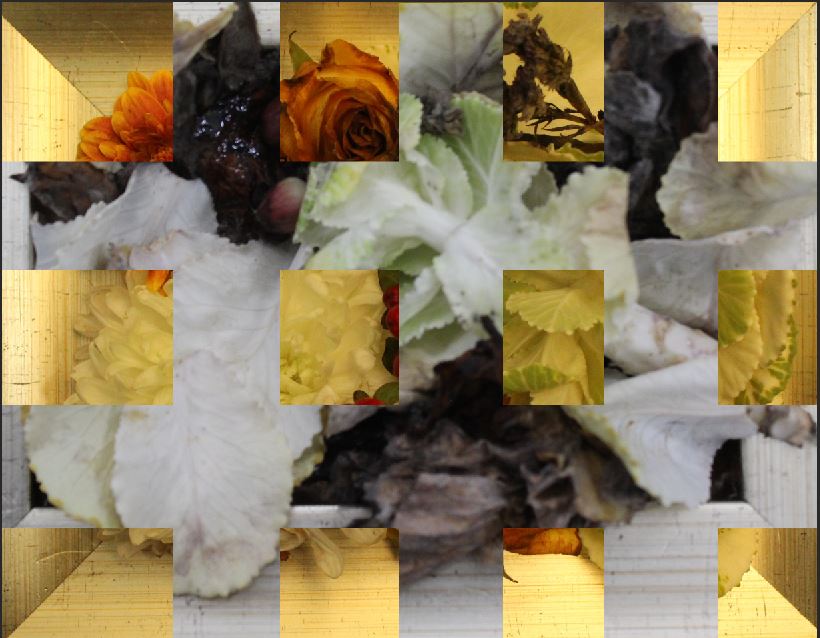
|


Original
|
Final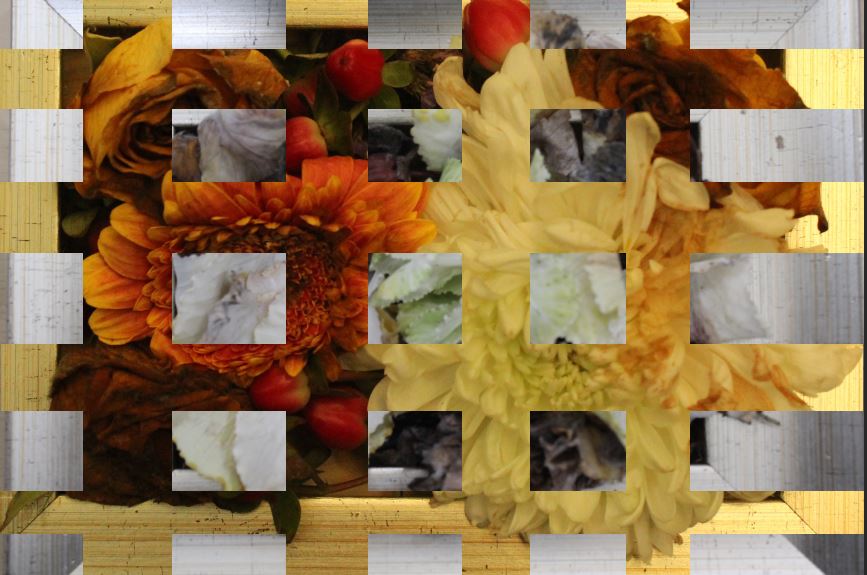
|
Steps


Original
|
Final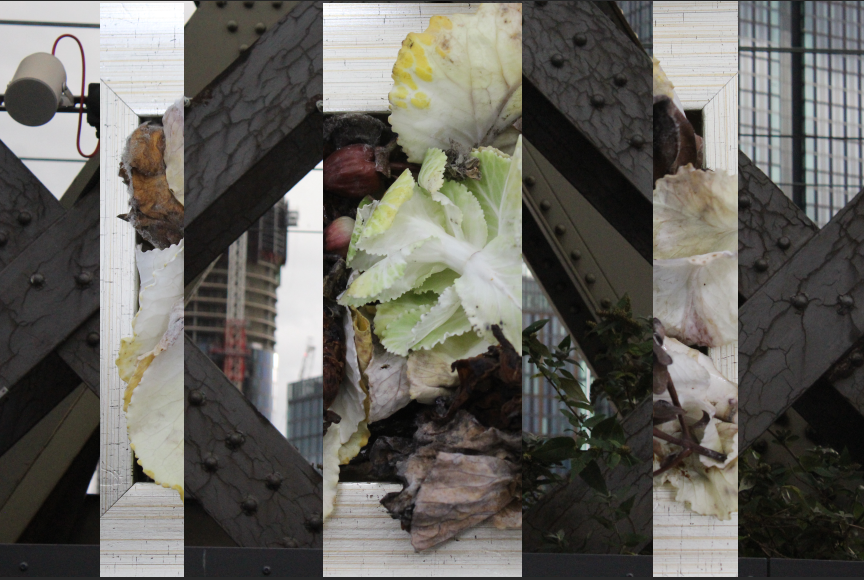
|
Taking my pictures further - Black and White

|

|


FINAL GALLERY


|
After reflecting on my final images, I wanted to do something much more creative with my photos to get a higher grade and I did this by creating striped images of my photos and creating a type of book to showcase my images, this really allowed me to get creative. First using a guillotine and glue I cut strips of my images an glued them on to the piece of card and made patters using other image strips, I used images that contrasted especially well with each other. Then, after doing this to make at least 4 patterns, I made a sort of book using scrap card strips to stick each of them together, because I stuck them together with space in between then I was able to fold it up and keep it together. As the back looked quite plain, again using my image I made patters on it however I made patters that weren't stripes I did it using random shapes. Finally, I made a small file type holder to slide it into and keep it safe whilst also presenting my image. |
|


Evaluation
My main theme was Framing and I explored the different types such as natural, manmade, architecture, using different frames in those topics. I thought the theme was an interesting one because I was able to stick to taking picture of things that captivated me such as flowers and plants, it allowed me to be creative with what I did and improved my skills on how to make an image more interesting or how to use a frame within a photo.
In this certain topic, I found playing in Photoshop the most intriguing part as I was able to manipulate the images to improve them and leave the effect I wanted to on the viewer. I tried different techniques and chose the one I felt would get me the best grades and give me good marks overall, I used tutorials and asked teachers. I also enjoyed taking photographs outside of the school as it allowed me to get a variety of pictures.
The new techniques I experienced with this topic was being able to learn 3 different techniques on Photoshop, I found it a bit challenging remembering all the steps sometimes but overall it was really useful to my photos, pushing them to a higher grade. I improved this skill by getting my teacher to give me feedback and that's when I was given the idea to make grids on my photos, putting one photo on top of the other.
I would like to develop my studio skills more, like setting up a photoshoot, taking photos, how to improve my photos whilst taking them, before editing them in Photoshop. For my next project I would like to learn about lighting, figuring out how the light you have your angle at affects the images outcome, or how different light colours affects the photos, improving the photo in itself.
In this project, I did my research on 3 photos however one photographer was unknown and I wasn't able to find anything on that specific photo. The first photographer I researched was Robert Caspers who took a photo on the framing of fruits, it seems like a painting, I did end up taking photos quite similar to the photo I chose. However, I felt as if didn't look similar enough and decided to improve it and make it a bit more personal in Photoshop. The other photographer was Alex Baker who took a picture in a field of a mirror that had been edited, it looked intriguing but as I went on with my project I felt like it wasn't something I wanted to do and I changed the path I wanted to take. However, I kept it on my page to show the route I had chosen to take throughout the entire project.
I especially enjoyed going out on location throughout the project, it was useful being able to take photos outside of school, having more of a variety which allowed my project to be more expanded. I also really enjoyed using Photoshop because it really helped give me an even better outcome that I could easily improve more and I explored many different techniques.
I personally think that the most successful part of my project is my outcomes, I feel like Photoshop helped improve my images and make them more intriguing and interesting. I also feel like my whole page seems quite professional and the Manchester images that I got, makes it all look quite good.
Throughout the project I had a pretty good idea on what to do, other than when I got a bit confused when trying to copy my first mood board and research on Alex Baker, I didn't know where I wanted to take my project after doing my first two shoots. I then took some time to go over my work and decide what I wanted my outcomes to be in the end, and decided to go onto framing nature.
All of the camera setting I learnt, I learnt from my teacher, however, I learnt some photoshop techniques by tutorials but also by messing around in Photoshop, looking at the different skills and asking my peers. For my research, I looked at previous work from other students and looked through my work to see how I could pick up more marks, using better terminology.
If i was given the chance to complete the project again, I would be sure I knew what to do and where I want to take my project before taking any photos or doing my researches and mood boards. I would also manage my time more responsebily, doing some work outside of school and focusing inside lessons, not letting myself get distracted too quickly.
